
What is automation for Jira?
First, let’s start with some context as some of you might have heard of Automation for Jira (AFJ) before. Automation for Jira is/was an app which allows you to automate actions in Jira based on events and triggers. For example:
- Assign an issue to a certain user based on priority or other field value;
- Close related stories when the epic is completed and vice versa;
- Create weekly recurring issues with a 2-week advance;
- Add a comment to an issue when the due date is less than a day;
- Send a warning to the service desk team’s Slack channel with SLAs at risk of breaching;
- Link support requests from the same reporter together;
- Automatically create a bug in a software project when a customer files a bug report through the Jira Service Desk customer portal;
- And many more…
These examples could of course also be created by workflow post functions (e.g. JMWE or JSU) or a custom script (e.g. Scriptrunner). But what makes automation so powerful is its user-friendliness and the possibility to create automation on a project level as a project administrator. You do not need to write code nor have to be a Jira administrator to make use of it!
What is free when?
Before we start to dive a bit deeper, let’s discuss when and what is free. AFJ used to be a paid app and is developed by an Australian company named Codebarrel. In October 2019, Atlassian announced it acquired Codebarrel and starting this month, AFJ functionality is included for free for Atlassian Cloud subscribers, but with a few restrictions. Do note that for the Server and Data Center applications, AFJ is still a paid app in the Atlassian marketplace.
Jira Cloud has 3 plans: Free, Standard and Premium. All these plans now include unlimited project automation rule executions, yay! But rules can also be created on a global level (by Jira admins only) and Atlassian chose to limit the number of global automation rule executions based on which plan you subscribed to.
For these global rules, Atlassian handles the following limits per plan:
- Free: 100 Execution limit/per product per month
- Standard: 500 Execution limit/per product per month
- Premium: 1000 Executions per licensed user/per month (combined for all products)
If you exceed the limit, the rules won’t get executed anymore. This can lead to all sorts of problems depending on how dependant you made your processes in Jira on these automations. So choose your rules wisely and try to prevent creating global automation rules or subscribe to a premium subscription.
You might ask yourself, what is a rule execution? Well, an automation rule is triggered by an event. So, every time that event occurs counts as one rule execution. Let’s say you create a global rule that gets triggered by the issue updated event, then every time an issue is updated (field changed, a transition made, etc.) the rule gets executed.
So, there are rules on project level which only listen to events that happen in a single project and there are global rules, which listen to events in the entire Jira instance. You can imagine, that in case of the example above, this can quickly run into the thousands of rule executions per month for larger instances.
Creating your first automation rule
 Codebarrel’s slogan for AFJ has always been “Drag & drop automation rules” and it really is that simple. Let’s create our own rule to see how simple it is and understand its powers.
- First off, we need to know what we are going to automate. For this example, let’s automate that when the priority of an issue in this project gets set to High or Critical, the issue will automatically get assigned to yourself.
Navigate to a project where you have the project administrator role. Click on project settings and then scroll all the way down to Project automation.
In the top right corner, you will see a button called Create rule, click on it to create a rule. 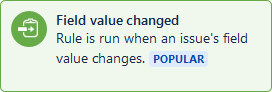 Next, select what should trigger this rule (e.g. what must happen for this rule execute). In our case, the value of the Priority field must be set/changed to High or Critical. So we select the Field value changed trigger.
Now select the field that needs to be monitored, which is the Priority field in our case. You can leave the For option empty. Hit Save.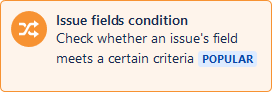 We have our trigger setup, but now we need some conditions because we only want this rule to continue when the field value is High or Critical. Select New condition and choose the Issue fields condition.
For the condition, select that the Priority field must be great than or equal (condition) to High (value to compare) and hit Save.- Last but not least, we need to perform the action of assigning the issue to a certain user, in this case, yourself. Select New action and choose the Assign issue action.
Assign the issue to Specify user, select yourself (name) as the user and again, hit the Save button.
You could add even more conditions and actions, but let’s keep it simple and stick to what we have now.
Give the automation rule a descriptive name, like Auto assign high priority issues or similar, and click the Turn it on button.
Yeah, you did it! Your first automation rule. Just imagine the possibilities!
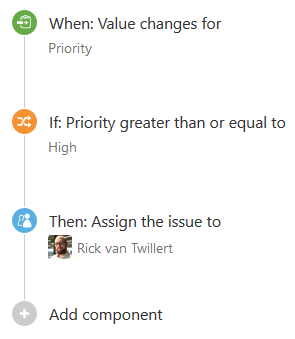
Your automation should look similar to this
You can now test the rule, to verify that it works. Change the priority to High or Critical of any issue in the project and check if you get automatically assigned to the issue. The issue history will display something similar to this:

Advanced automations
While creating your first automation, you might have noticed that there are dozens of triggers, conditions and actions available. You can combine all of them, create IF-ELSE structures, branch-related actions for modifying linked, parent and child issues. The possibilities are endless.
 The number of supported third-party apps that are available in automation also keeps growing. Think of communication tools like Microsoft Teams, Slack and Twilio. You could, for example, notify your team when an issue is set with a high or critical priority in the previous example. Just add (or replace the assign action with) the Send Slack message action.
If you want to include issue details in the Slack message from the example above, you can use smart-values. They allow access to pretty much any issue data in an automation rule. Read more on smart-values.
For even more advanced use cases there are options to create a webhook trigger or even send a web-request and use the fetched data further on in the automation rule. Which opens up a world of possibilities. This blog post explains how to setup up an automation rule that allows you to track pull requests from your favourite SCM tool with Jira tickets. Fully automated! It even explains how to automate releasing a version in Jira when it is created in an SCM tool. The blog post uses GitHub as an example, but it can be used with all common SCM tools.
Automation and Jira Service Desk
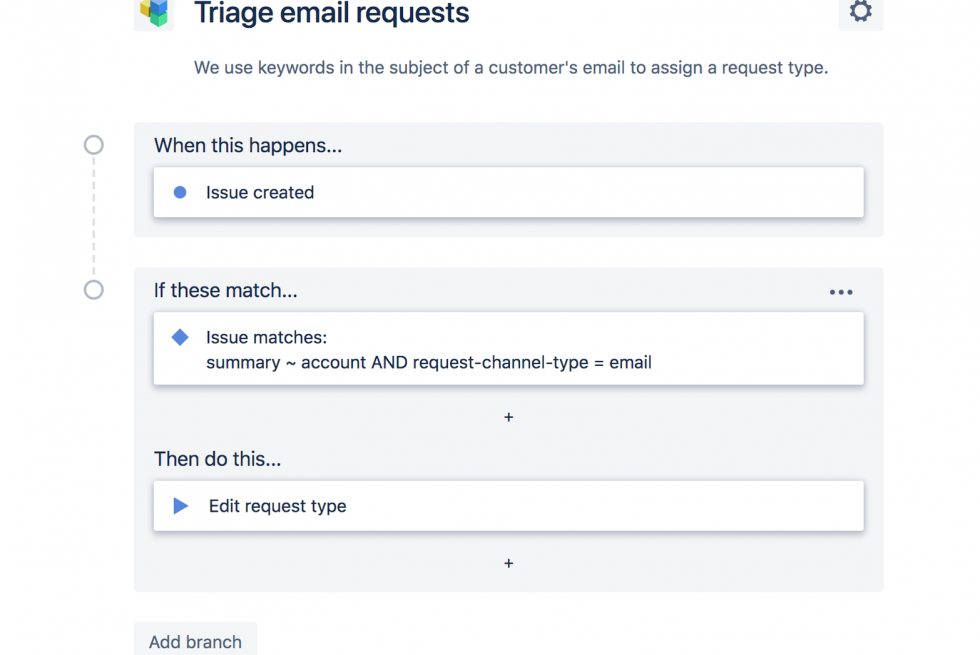
Jira Service Desk (JSD) natively has automation functionality, which focusses on service desk related activities. Though more limited than AFJ, it can do some things that AFJ can’t. Like changing the request type based on a field value.
We suggest that you first try to automate your service desk related activities with the native JSD Automation. If that does not provide a solution, try it with AFJ.
You can find both automation options in the project settings:
- The native JSD automation: Project settings → Automation
- Automation for Jira: Project settings → Project Automation
Tips and tricks
To help you along the road of automation, here are some tips and tricks:
- Make rules as small as possible. Do not over-complicate rules, when two rules will do the job more effectively.
- Give your rule a short, but descriptive unique name. Provide more details about the rule in the rule’s description.
- Test your rules before releasing them out in the open.
- Inform your team/project members about new rules.
- It is important that the user executing the rules has all the necessary permissions for the conditions and actions that make up the rule. Else the rule will fail on execution. Especially for global rules spanning multiple projects.
- Make sure you get notified once the rule starts failing. This way you might be able to detect unwanted project configurations. (Rule details → Notify on error/Owner)
- Every rule has an audit log in which you can check successful and failed rule executions, errors and config changes.
- Automation rules can only get triggered by events. You can’t use AFJ to prevent or warn when certain transition conditions aren’t met. For these type of actions, you can use apps like JMWE or JSU.
Let us help you!
Hopefully you are all set now to start taking advantage of the AFJ functionality in your Jira Cloud environment. When you are not able to accomplish what you are trying to automate, get in touch! We’ve implemented thousands of automations over the years and will surely be able to help you. Of course, you can also reach out to us if you have any questions regarding Jira Software, Jira Service Desk for Cloud, Server or Data Center. In fact, you can contact us for any of your Atlassian related questions. We look forward to talking to you!