Even for us as consultants, Advanced Roadmaps is something we, at some point, looked up against. I can’t imagine what the average Jira user must feel like.
You can read the dozens of articles available and watch an endless stream of YouTube videos, but what (in our opinion) would be really useful, is to have something to fall back on. Short, simple and practical. Something you can quickly scan and find that one thing you’re struggling with without all the bullshit. Like a one-pager or cheat sheet. That’s why we introduce to you The Advanced Roadmap Breakdown! (Bookmark this page!)
This blog is based on Advanced Roadmaps for Jira Software Cloud which is only included in the Premium and Enterprise plans.
What is Advanced Roadmaps?
Advanced Roadmaps is a feature in Jira Software that allows you to plan work across multiple teams and/or Jira projects in so-called Plans without affecting the issues in Jira until you have found “the holy grail” (reviewed the changes).
Advanced Roadmaps lets you manage team capacity/velocity, cross-project releases and dependencies, warns about risks, and also has an option to automatically schedule based on all of these.
Once you’ve finished (or skipped) planning, you can visualize work and track progress by using various perspectives (views) and different scenarios.
What is a Plan?
A collection of Jira issues from one or more boards (issue sources) that outline one or more organizational goals (e.g., initiatives) in a Roadmap overview to reveal and plan the “bigger picture”, beyond the Epics in Jira. The hierarchy levels in Advanced Roadmaps make this possible.
You can also use Jira projects and/or issue filters as an issue source, but only (scrum) boards allow you to plan in sprints!
Use exclusion rules to limit the scope of your plan to only the relevant issues and/or releases.
What are hierarchy levels?
Top menu bar: Plans → Settings → Advanced Roadmaps hierarchy configuration
On Jira’s team/project level, the highest hierarchy level is the Epic. One level down its Stories and Tasks and below that, their Sub-tasks. With an Advanced Roadmaps Plan, you are planning on an organizational level, so beyond Epics. Therefore, Advanced Roadmaps allows you to create one or more hierarchy levels above Epics.
For example: Vision → Initiative→ Solution→ Epic → Story
Decide on which hierarchy level your Plan operates. In the example above, you could create a Plan to realize a specific Initiative that works towards the company’s vision. The Initiative breaks down in Solutions and each Solution breaks down in the Epics on team (i.e., board) level.
Hierarchy levels are configured globally (for all plans!) and require at least one dedicated issue type per hierarchy level.
Issue types must be associated with an issue type scheme that is used by a project, before they become available in the hierarchy configuration.
How to manage Teams?
Plan: View Dropdown → Teams
A team is a group of users that work together to achieve a goal (duh). Teams allow you to plan by capacity (days or hours per week) or velocity (story points per sprint). In Advanced Roadmaps, a team is either:
- Private (Plan only): created in a Plan and only available in that single Plan.
- or Shared: created globally and can be used in one or more Plans.
Within a Plan you can configure per team, shared or private, the associated issue source (e.g., a board) and team type:
- Kanban: capacity in days or hours per week.
- Scrum: capacity (as above) or velocity in story points per sprint and the sprint length.
Story point estimation is only available if all teams in the plan are of type scrum!
Change the capacity/velocity under Plan: ●●● → Configure → Scheduling → Estimation.
Private (Plan only) teams can be converted to a shared team, but not vice versa. This “share” option is only available if the plan doesn’t have any changes that need to be reviewed.
Add the team field to your issue screen(s) to have to team available from the issue view in Jira.
Note that only shared teams are available in JQL (reporting) and the issue view in Jira.
How to manage Releases?
Plan: View Dropdown → Releases
Releases are the milestones in a plan, like a program increment or something shippable. They mark a point in time when they need to be completed (and started).
Releases associated with the issue sources are automatically available, but you can also create new ones on the spot. Advanced Roadmaps allows aligning releases across projects by grouping them in cross-project releases.
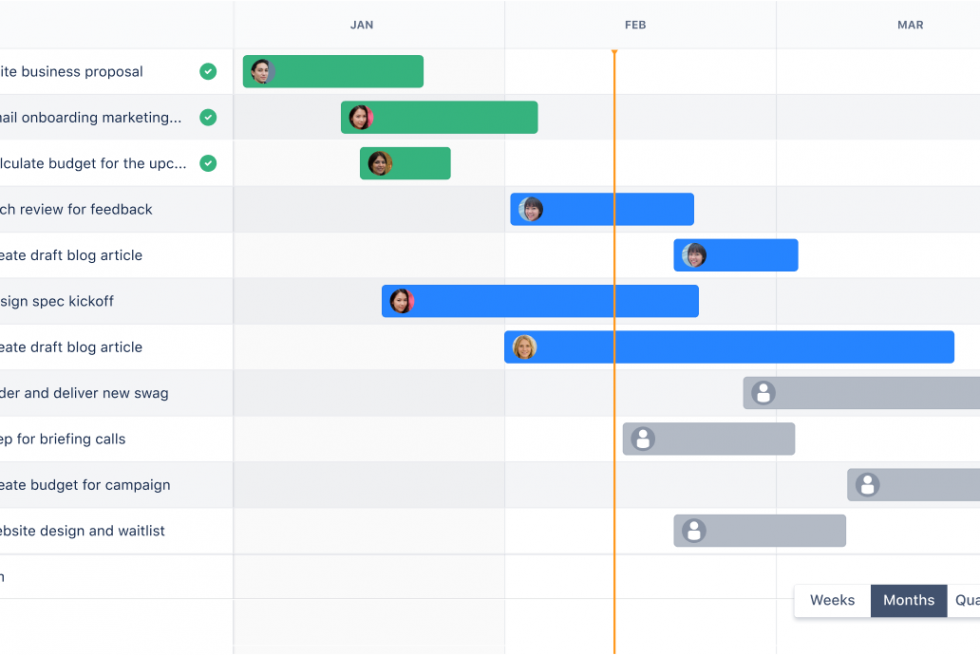
On the Plan’s roadmap, all releases are displayed as milestones, red when off-track and green when on-track. You can get a release back on track by, for example, adjusting the release dates.
A cross project release itself is only available in Advanced Roadmaps. The releases that make up the cross project release are available in each associated Jira project.
Only one release per project can be added to a cross-project release.
How to manage dependencies?
Dependencies show how issues rely on other issues. This relationship is created with Jira issue links. Issue links can be created in Jira or in the Plan’s roadmap by dragging an issue’s end date to another issue’s start date (or vice versa).
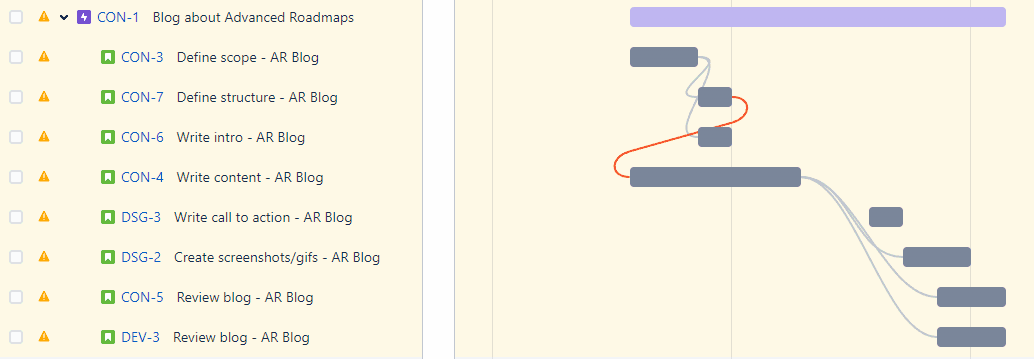
Dependencies are shown on the Plan’s roadmap as lines between the issues as default. Risky dependencies have a red line. For example, an issue that is blocking another issue, but is planned after the issue it’s blocking.
Alternatively, with the Dependencies report (Plan: View Dropdown → Dependencies report) you can visually trace dependencies on different issue levels, cross-project, zoom in using filters and switch back and forth to the location on the Plan’s roadmap.
By default, Advanced Roadmaps only looks at the “blocks/is blocked by” issue link type. This is set globally! More link types can be added (again globally!) through the top menu bar: Plans → Settings → Advanced Roadmaps dependencies
How to work with Views and Filters?
The Filters and View settings on the Plan’s Roadmap allow you to create a focused overview of a Plan. Once satisfied, you can save the View settings and applied Filters to the current View or a new View. This allows you to create multiple views of the same Plan for different audiences.
Filters allow you to scope the Plan’s roadmap view, not the Plan! With the Hierarchy filter, you can limit the issue types displayed. The Show full hierarchy option will display all issues in the hierarchy, even issues excluded by the filter will show, but these will be grayed out.
View settings allow you to:
- Color code issues based on priority, issues status, project, etc.
- Group issues in horizontal lanes (swimlanes) on the Plan’s roadmap by Team, Sprint, Project, etc.
- Roll-up (sum) dates, story points, etc. to the parent hierarchy level. E.g., show an Epic‘s total story points or duration based on its Stories and Tasks.
- Sort issues on each hierarchy level by Rank, Priority, Due date, etc.
- Change how dependencies are displayed. Use badges if your Plan’s roadmap gets messy because of all the dependency lines.
How to review changes and use Scenarios?
None of the changes you make in an Advance Roadmaps Plan are visible in Jira until you review (approve) the changes. This allows you to play around with the Plan’s roadmap without affecting the teams working with the issues in your Plan. On the other hand, changes made in Jira, are directly visible in Advanced Roadmaps.
Next to that, an Advanced Roadmaps Plan, allows you to create different “what if”-versions of your Plan, called scenarios. Changes made to issues, teams, and releases in a scenario, are only reflected in that single scenario of your Plan. Views are shared across scenarios.
Changes made to issues in Jira itself, that are part of your Plan, will be reflected in all scenarios!
Scenarios are disabled by default. To enable them, go to your Plan: ●●● → Configure → Scenarios → Enable Scenarios
How to manage risks and work with auto-scheduling?
Based on your planning and issue data, Advanced Roadmaps will give warnings (in other words, identify risks) mainly regarding issue dates and the issue hierarchy. Warnings can be turned off altogether or individually. You can also filter on only issues for which warnings apply.
Off-track releases (milestones), team capacity/velocity, and conflicting dependencies are not covered by the warnings functionality. These are highlighted in red though on the Plan’s roadmap. By clicking on them, you will get more details about the conflict and thus are able to resolve them.
Try to resolve the warnings before saving the changes to Jira (review changes).
Auto-scheduling is a feature that allows Advanced Roadmaps to automatically plan the (selected) issues in your Plan for you. Several factors are considered, including estimates, team velocity/capacity, dependencies, and more.
When clicking the Auto-schedule button, you get the option to overwrite existing data for Sprints, releases, and teams. Once set, hit preview. Your current Plan’s roadmap view will reflect the changes made by auto-scheduling and you can accept the changes or discard them. Accepting the changes means they will be part of your Plan but are not saved to Jira yet.
Jira issues in active sprints will not be affected by the auto-scheduling!
You can either auto-schedule for all issues in the plan or for a selection of issues, by using the scope selection (checkmark in front of each issue).
Create a separate scenario for auto-scheduling to easily compare the outcome.
How to share your plan?
Plans or scenarios can be shared in 4 different ways using the Share as button:
- As a link that can be sent by email or chat.
- Embedded on a website using an iframe.
- In Confluence. Pasting the generated link on a Confluence page will add the Advanced Roadmap macro to the page. This is useful to provide context for the Plan or scenario.
- As a CSV, for exporting data to use in reports, and/or to create diagrams.
Shared Plans and scenarios include unreviewed changes!
Except for CSV, Shared Plans/scenarios are interactive but read-only. All share options require at least Plan view access (jira license and login) to be able to view the share.
Tips and Tricks
- Changes made in Jira are directly visible in Advanced Roadmaps Plans unless it concerns a changed value that also has been modified within the Plan but has not been reviewed (saved to Jira) yet. Discard the Advanced Roadmap change, to view the update made from Jira in your Plan (or scenario).
- When reviewing changes, make sure the right scenario (if used) is selected first!
- When using the auto-schedule functionality (results may vary!), make sure you have no unreviewed changes, so you can easily undo the auto-scheduling by discarding the changes made. Alternatively, create a new scenario to play around with auto-scheduling.
- Estimate all the work, but only on Story level (not Epic nor Sub-task) when using Advanced Roadmaps. Use the roll-up functionality in the View settings to see the cumulative Epic estimate from its stories.
- To get acquainted with Advanced Roadmaps, start small, with a single board or project Plan and start planning the work manually first.
- Advanced Roadmaps has permission settings on both global and Plan level. Keep that in mind when struggling with permissions. More details…
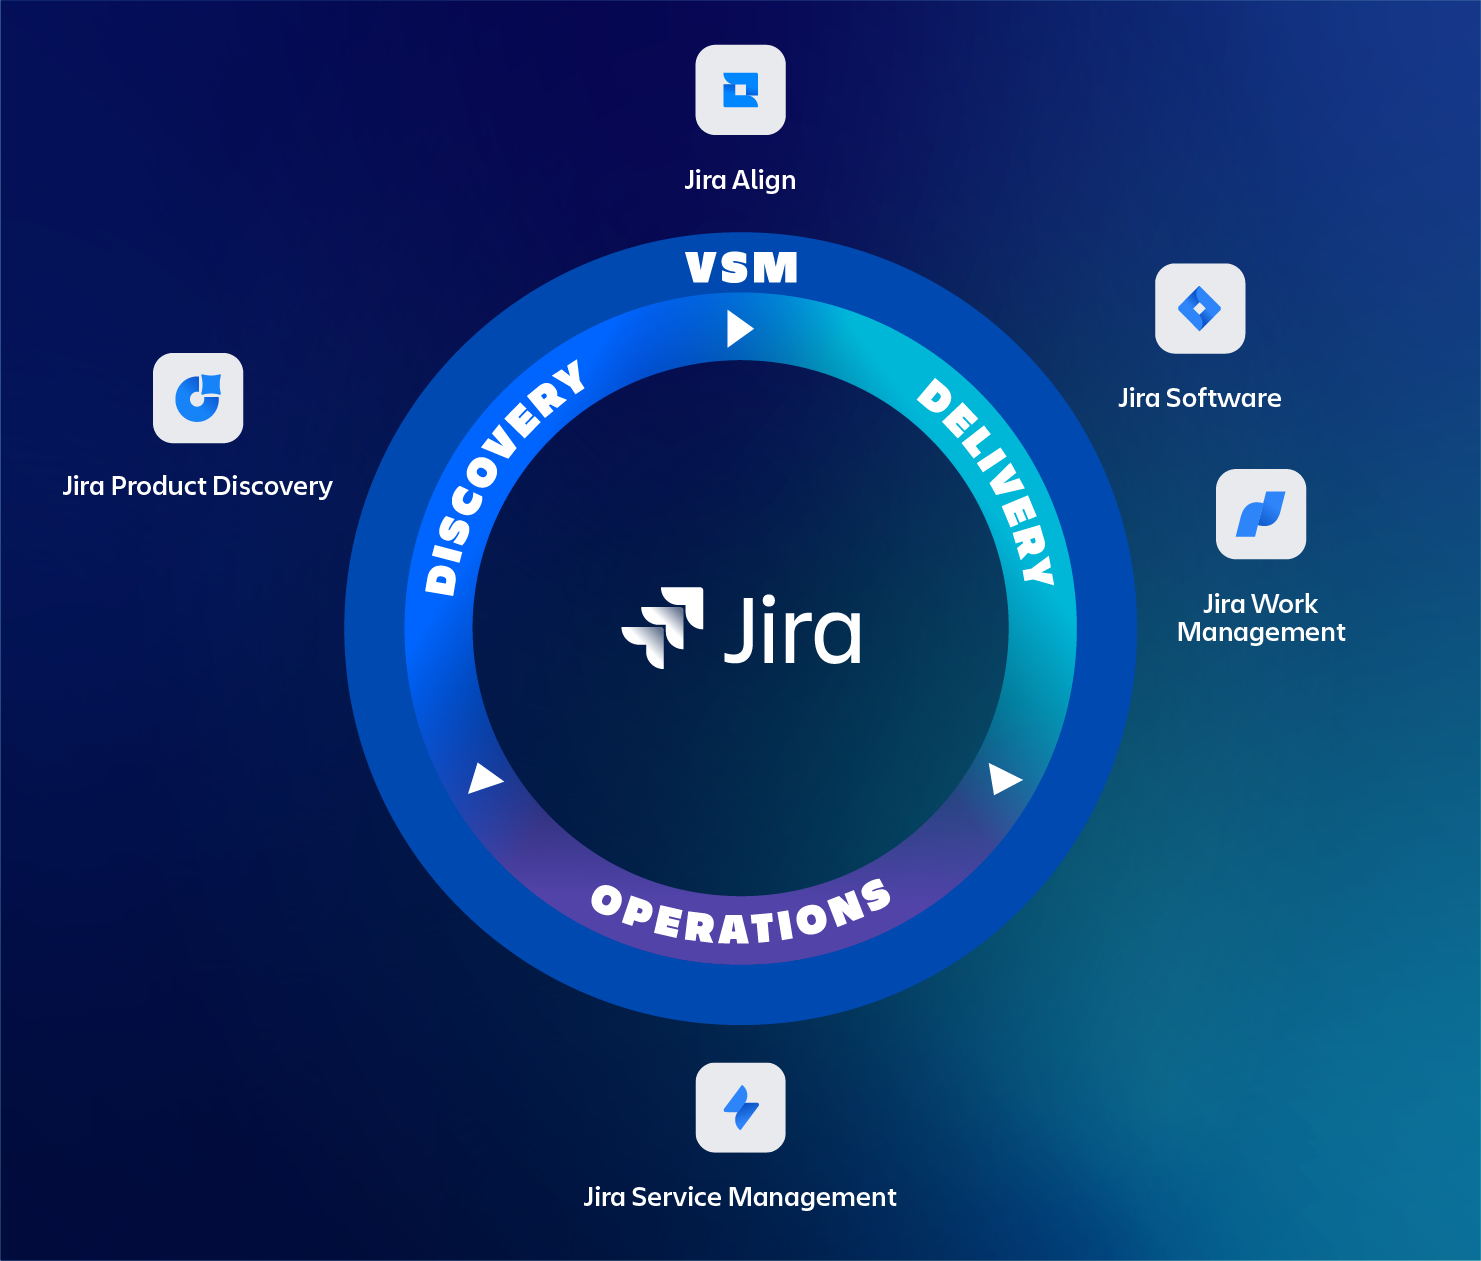
- Advanced Roadmaps is an agile planning tool that can help visualize, track and plan work across projects and teams in Jira. Though Advanced Roadmaps can facilitate organizations managing agile at scale, it is not the intended purpose. You might want to check out Jira Align.
- External sprints EXT are sprints that are not registered in Jira. These external sprints are created if you are planning in sprints but selected a project or issue filter as the issue’s source. Update the issue source to use a scrum board instead. More info…
- When sharing a Plan through Confluence, the view settings at the moment of sharing are static in Confluence, meaning that if you update the filter or view settings, this won’t be reflected in Confluence, unless you regenerate the share macro link.
- Advanced Roadmaps Plans have a 5,000 issue and/or 100 projects limitation. Make sure only relevant issues are included in your Plan by using exclusion rules or consider spreading the work across multiple Plans or picking a lower hierarchy level.
There’s is no limitation in teams, but Atlassian recommends a maximum of 50 shared teams per Jira (not Plan!).
Ready to play? Create a Plan!
With the above information as a reference, you should definitely be capable of creating a Plan!
From the top menu bar hit Plans → Create Plan
And remember, none of the changes you make in an Advanced Roadmap Plan will reflect in Jira unless you review and save the changes to Jira.
Need help?
If you still have any questions regarding Advanced Roadmaps – or any other – Atlassian topic? The certified experts of TMC ALM are happy to help you with all of your questions, requests, or remarks. Feel free to reach out to us via our contact page to start the conversation.