Jira for lead management
Our contact form on our website is redirecting e-mails to Jira, resulting in automatic ticket creation for new leads.
This works really well, we create transparency within our organisation, we can assign people to leads and specify a lot more details to this potential customer. Have we served this customer before? What are the services that this customer is interested in? Have we made a proposal yet or are we awaiting more input?
These are things you can’t extract from a mail thread when using a shared mail account for the sales team.
To keep track of the communication, we either e-mail via Jira or include our general sales e-mail address as a CC so all e-mails being sent and received are also added as comments to the related Jira ticket.
This is where Confluence steps in
This last point, having all e-mail conversations as comments in our Jira issue, is also often problematic. Due to all the comments added and no hierarchy in them, it’s difficult to find back highlights on a conversation. Adding those as bullet points to the description is not good enough as it doesn’t allow you to collaborate on them.
Using a Confluence page allows us to;
- Specify which stakeholders are involved and what their role is
- Specify who’s allowed to make a decision
- Specify highlights or flag important notes
- Include meeting notes
- Collaborate on content
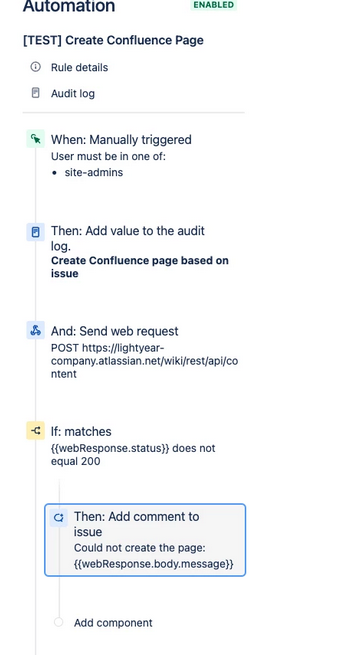
Automatic Confluence page creation using Automation for Jira, step by step
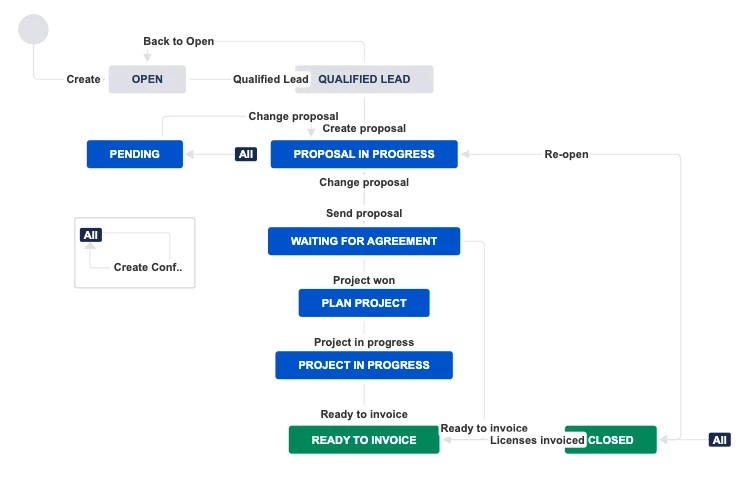
1. Work with Global Transitions
Create a global transition loop; You might have seen it in the workflow screenshot, we’re creating the Confluence page right from the related Jira issue using a special global looping transition.
The following Atlassian Community posts explains in detail how to do so.

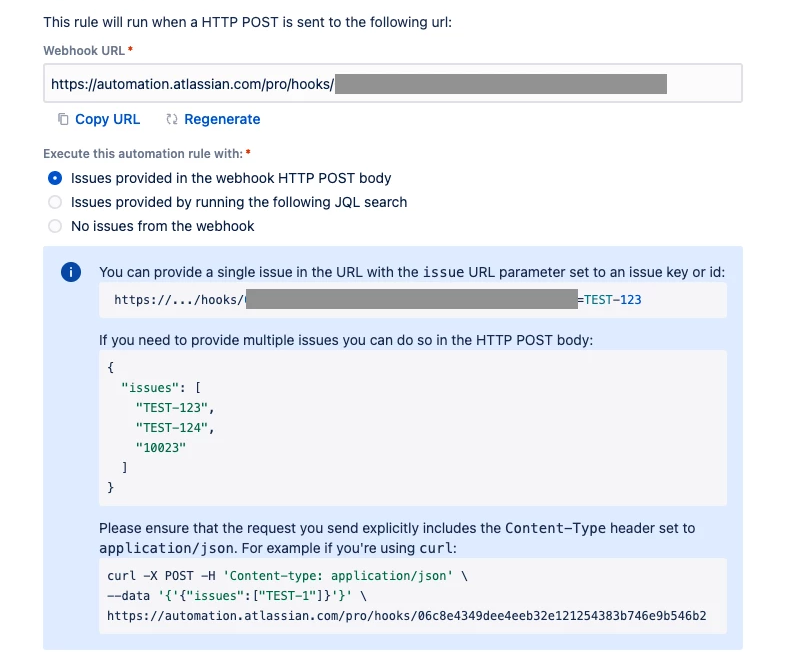
2. Incoming Webhook
Automation for Jira does not support to trigger an action based on a custom event, see https://jira.atlassian.com/browse/JSDCLOUD-4461.
When you want to work with a Global Transition Loop, you’ll have to make a call to a basic Jira WebHooks and forward that to an Incoming Webhook defined in Automation for Jira
3. Post your page
You can either post your own page or fetch the contents of an existing page as a template and create a new page based on this.
If you need the body storage format of an existing page, use the URL: https://<sitename>.atlassian.net/wiki/rest/api/content/<pageId>?expand=body.storage
- If you’re making use of an existing page, note that you can’t replace body content with Jira information, as Automation for Jira does not support the usage of nested variables, see https://codebarrel.atlassian.net/browse/AUT-2086
- You can’t post the author of the page, it will use the credentials provided in the basic authentication request. Make sure this user has permissions to create the page and link it to your Jira issue.
Here are two examples of new pages.
{
  "title": "KB - {{issue.key}} - {{issue.summary}}",
  "type": "page",
  "space": {
    "key": "<space key>"
  },
  "body": {
    "storage": {
        "value": "<ac:layout><ac:layout-section ac:type=\"single\">
<ac:layout-cell><p>
<ac:structured-macro ac:name=\"jira\" ac:schema-version=\"1\" ac:macro-id=\"f69babcc-73d3-459f-b293-f705404487bb\">
<ac:parameter ac:name=\"server\">System JIRA</ac:parameter>
<ac:parameter ac:name=\"columns\">key,summary,type,created,updated,due,assignee,reporter,priority,status,resolution</ac:parameter>
<ac:parameter ac:name=\"serverId\">0b3ca688-de42-3628-9deb-3d904609ac2b</ac:parameter>
<ac:parameter ac:name=\"key\">{{issue.key}}</ac:parameter></ac:structured-macro>
</p></ac:layout-cell><ac:layout-cell><h1>Description</h1><br /><p>{{issue.description.htmlEncode}}</p>
<br /></ac:layout-cell><ac:layout-cell><h1>Problems Identified</h1><br /><p>{{issue.description.htmlEncode}}</p>
<br /></ac:layout-cell><ac:layout-cell><h1> Resolution Action</h1><br /><p>{{issue.description.htmlEncode}}</p>
<br /></ac:layout-cell></ac:layout-section></ac:layout>",
        "representation": "storage"
    }
  }
}
A new page with a Jira macro
{
   "type":"page",
   "title":"{{issue.summary}} ({{issue.key}})",
   "space":{
      "key":"<space key>"
   },
   "ancestors":[
      {
         "id":"<page id>",
         "type":"page"
      }
   ],
   "body":{
      "storage":{
         "value":"<ac:structured-macro ac:name=\"children\"
                  ac:schema-version=\"2\" data-layout=\"default\"
                  ac:local-id=\"a1944611-6a88-42b6-bb22-2c32b2dbc461\"
                  ac:macro-id=\"cc865028-07fd-4ad5-a278-f771537083ea\" />",
         "representation":"storage"
      }
   }
}
A new page showing the Confluence child pages
4. Link your newly created page
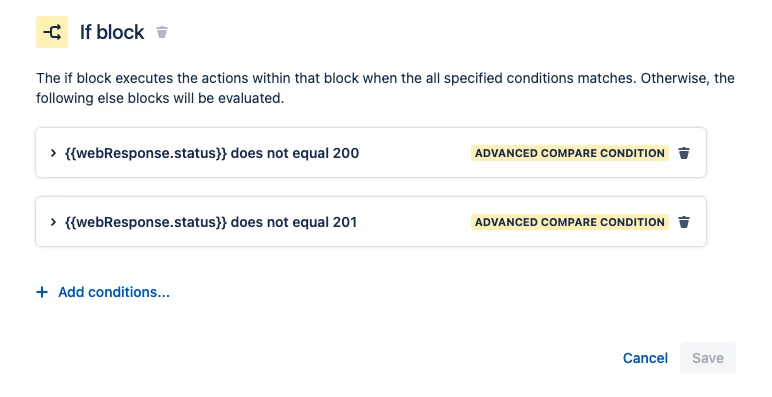
First of all, you should check if your page was successfully created. Most likely you’ll receive a HTTP 200 or 201 so you know you can continue.
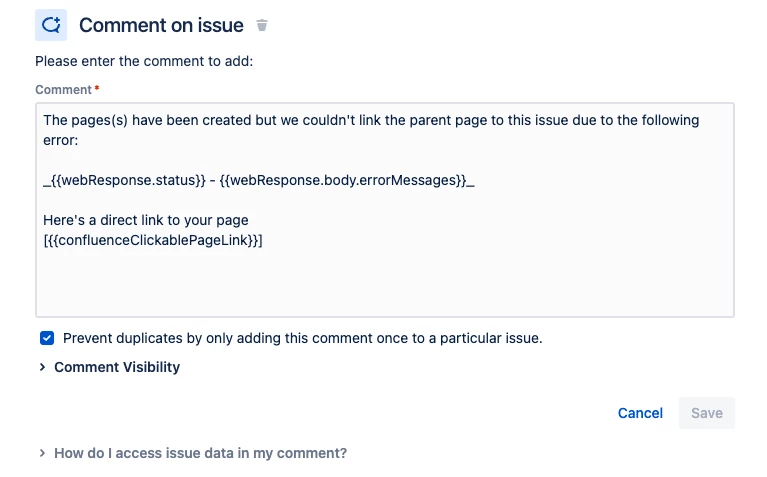
In case you don’t receive a HTTP 200 or 201, you can leave a comment on the issue with the error message, which will probably state the user doesn’t have permissions to create the page, a page with the same name already exists or the user doesn’t have permissions to link the page to the issue.
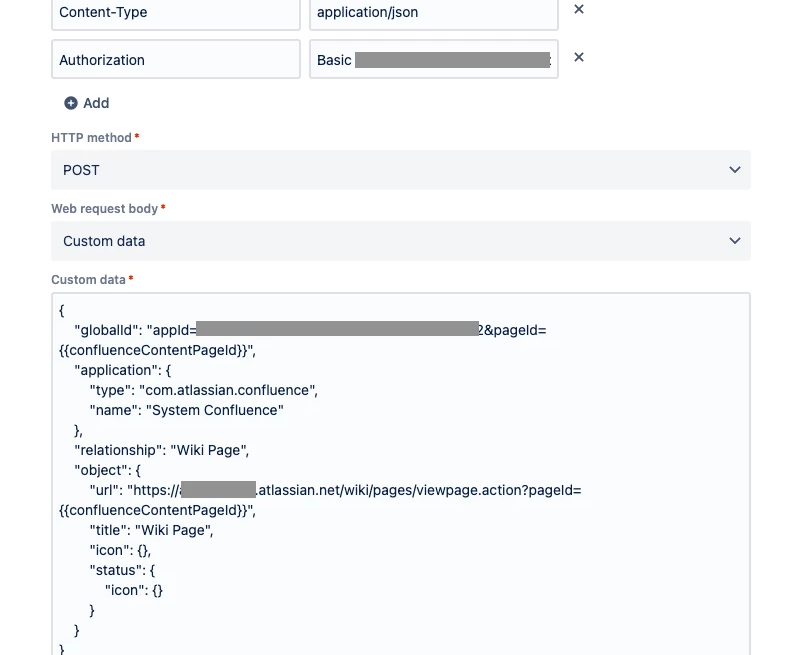
Link the page to the issue.
Bonus content
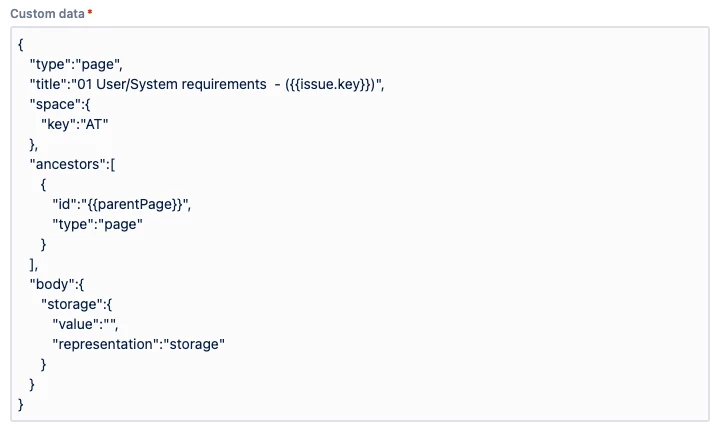
Create multiple pages in one go
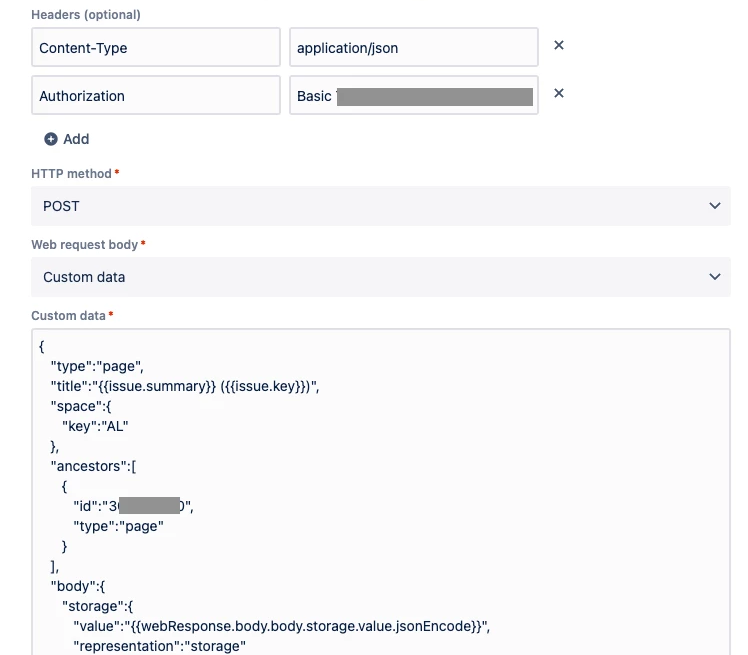
I’ve also implemented the scenario where a customer wanted to have a project folder of multiple pages being created automatically for a project. This contained a parent page for the project itself and a set of child pages for functional requirements, designs, meeting notes, etc.
To implement this, you’ll first need to post the parent page and save the returned webResponse into a variable to persist the page id which we need to re-use in future steps

Use IF/ELSE statements to verify the parent page is created before you continue. In my example I’ve checked the box Continue running the rule even if the request response is not successful (i.e. non-200 response) on purpose, because I want to leave a comment in my ticket in case it fails.

Next is to create a Web Request per child page you want to create, having the ancestors.id being the page id of the parent id.
What’s next?
First of all, know what you’re supporting. For Automation for Jira terms this is quite a technical implementation and you need to understand how it works so you can maintain it and be sure, you’re not the only one within your organisation that can support it.
Do you have scenario’s you’d like to share with us or would you like to make use of our services to implement a solution like this for your company? Don’t hesitate to contact us!