In March of this year, we’ve posted our blog on Automation for Jira. Since then we help customers using automation more and more. And the automation rules that are created are becoming more advanced by the day. In this blog, we’ll be sharing some of these advanced rules for Jira Service Desk (JSD) that might help benefit you as well. The following rules are featured:
- Use multiple email addresses for the JSD project
- Get information from external sources
- Get customer satisfaction comments (query Jira)
Use multiple email addresses for the JSD project
Let’s face it, we can’t do our work anymore without the use of software. It can be that your work processes are described in Confluence, your Scrum board is in the Cloud, your company operates web-services for its customers, or even that you make use of email (imagine that). Either way, you are depending on things to work. You are depending on your WiFi, your internet connection, your servers.
But you also know that from time to time services will fail. For this, you have added logging in your services and when things are starting to go south e-mails will be sent to different email addresses, so the right people are alerted and can act on it. Hopefully, an IT engineer will look at the emails coming in, creates a Jira ticket, copies data from the emails to the ticket, assigns himself and starts investigating.
Pitfalls
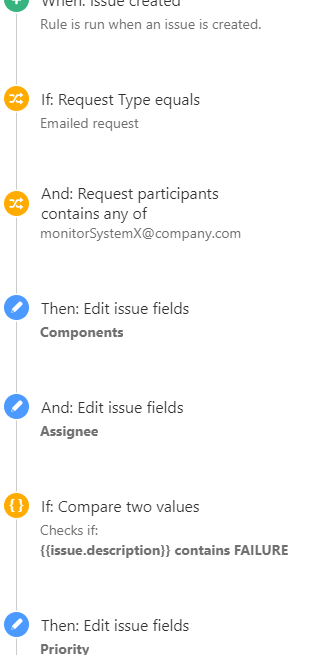
There are some pitfalls here. The first one is that somebody has to notice that emails are coming in. The next one is that an engineer has to manually create a ticket and has to copy data from an email to a ticket and finally that engineer has to assign himself to that ticket. Which all could take up valuable time which may disrupt your business longer than necessary.So let’s automate! A JSD project has only one email address, e.g. support@company.com. If you send an email to that address a ticket is created from it. If you want to use multiple email addresses you have to create an email alias, e.g. monitorServiceX@company.com. An email sent to this email address will be forwarded to support@company.com, the monitorServiceX@company.com will be in the cc. JSD will create a ticket and use the monitorServiceX@company.com as ‘Request participant’.
The rule itself is pretty simple, as you can see in the picture. You need to trigger on ‘Issue created’ and then check if the ticket was emailed. Then you should check if the monitorServiceX@company.com is a request participant and then you can do your actions. For instance, you can set the component to SystemX. You can assign somebody to the ticket, but it is always better to let the ticket end up in a queue where multiple engineers are responsible for.
And finally, you can check the description of the issue, which was the email body, if there was a FAILURE reported and adjust the priority of the issue.
Another big advantage of using JSD for monitor emails is that you can add knowledgebase articles in Confluence. The engineer who will start investigating the issue will see the knowledge base articles and can use them to speed up the investigation and solution of the problem.
Get information from external sources
Jira is not the only tool where information is stored. There is information in your CRM (like Salesforce, SAP, Microsoft Dynamics, Nimble, Hub spot), in your Asset Management tools (like Asset Panda, Snipe IT, Oomnitza), accounting tools (like Quickbooks, AFAS, Exact) or inventory tools (like EZOfficeInventory, Oracle NetSuite).
When you have multiple tools at your disposal the information can be scattered and hard to look up. In your service desk, you want to have the latest information at your fingertips, without having to look it up. A good example is an integration with a CRM system. Customers can create requests in your service desk and while you can ask them to leave there contact details it is of no use to bother them if they already supplied their details in an earlier interaction. We can retrieve it ourselves.
So let’s automate! The first thing we need to find out is the API call we need to do to get the customer’s contact details. In this use case, we show an example of a Hub Spot integration. Since we know the customer’s email address we can use that to get the information we want. We can use this API call:
https://api.hubapi.com/contacts/v1/contact/email/<emailAddress>/profile?hapikey=<api key>
The rule triggers on ‘Issue created’ and is followed by the ‘Send web request’ component. In this component, we use the following settings:The email address of the reporter is captured in the smart value {{reporter.emailAddress}}, but we need to use it in a URL and therefore will use the smart value {{reporter.emailAddress.urlEncode}}, which makes sure it is properly encoded to send as a URL.
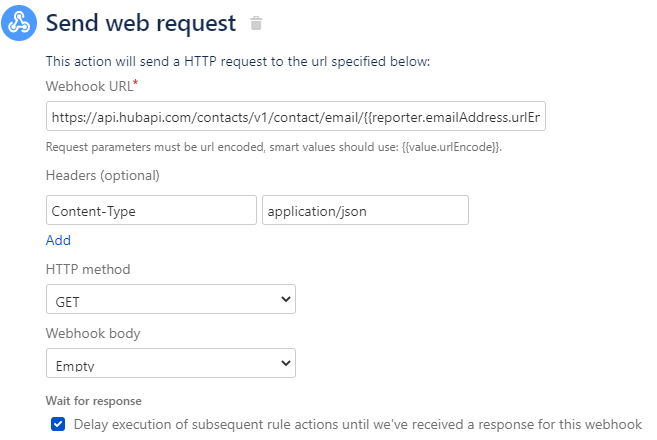
To make sure we get a JSON response we’ve added the header Content-Type: application/json. We use the GET method without a webhook body and, this is important, we check the ‘Delay execution’, want we want to get the response and use that information in the rest of our rule.
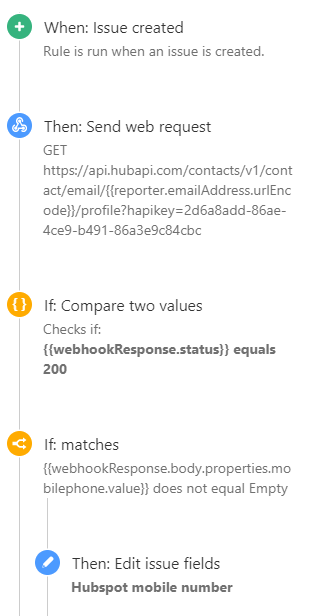
After we’ve got our response we check if the status is Ok and we do this with the ‘compare two values condition’:{{webhookResponse.status}} equals 200
If the email of the customer is not known in Hub Spot you will get a 404 status back. On which you might act by adding an else block and provide an automatic comment to the customer asking for their phone details.
But if you do get a proper response you want to check if you have the phone number on file and is so you can use it to set the custom field Hub Spot mobile number by using the ‘Edit issue fields component’:{{webhookResponse.body.properties.mobilephone.value}}
And besides the phone number, you can take in any data that is in the web response, like the company address, the customer’s position, etc.
Once you have completed your rule it is good to consider making a copy of it and change the trigger of the copied rule to ‘Field value changed’ for the reporter field. In case somebody else at the customer will take over the request.
It is worth mentioning that there are also dedicated apps that you can use to query external databases. Good examples are External Data for Jira Fields (Cloud) from CodeFortyNine and Elements Connect (server/Data Center) from Elements which you can use to query any SQL database, LDAP, or REST API and fill custom fields and shows live data in the way you want.
Get customer satisfaction comments (query Jira)
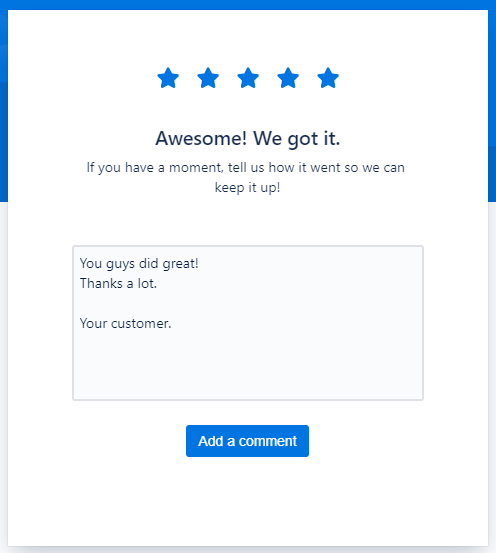
Measuring customer satisfaction (CSAT) can help you better understand your customers and improve service levels. Jira Service Desk provides a simple, built-in mechanism to collect customer feedback. When a request is resolved a single survey question will be sent along with the resolution email.

When customers rate the surveys the browser is opened and the customer can fill in additional comments.
Now you can use the report section of the service desk to find the last CSAT ratings and act on it. However, if you want to aggregate the ratings and comments per customer with JQL, you will notice that it is not possible to get the comments in your reports. This is because the CSAT comment is not stored in a custom field. How can we make sure we do get the comments in our reports? Of course with automation.
Let’s automate!
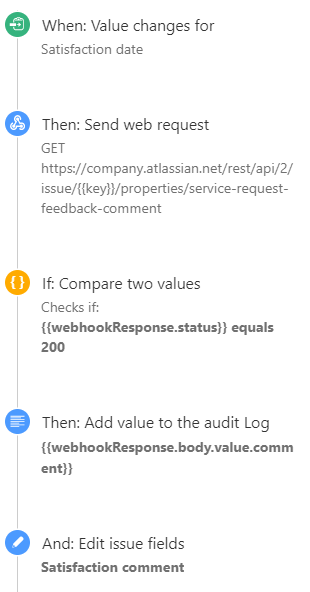
So, let’s automate! The first thing we have to do is to create our own custom field to store the satisfaction comment. Then we create the rule that triggers on ‘Field value changed’ for the ‘Satisfaction date’ field, which is an out-of-the-box field.
Now we need to get the CSAT comment via a secret (read: undocumented) REST API call 😉
Add a ‘Send web request’ component with the URL: https://<company>.atlassian.net/rest/api/2/issue/{{key}}/properties/service-request-feedback-comment
Use as header: Content-Type: application/json to get a proper JSON response and the header: Authorization: Basic <your API key>.
We are talking Cloud here and you can generate your API key by going here. Suppose you get the API key ABCDEF123456 then you still need this to encode it to base64 format. Go to https://www.base64encode.org/ and use <youremailadress>:<API key>. As example me@example.com:ABCDEF123456 will become bWVAZXhhbXBsZS5jb206QUJDREVGMTIzNDU2. To be complete your header will be:
Authorization: Basic bWVAZXhhbXBsZS5jb206QUJDREVGMTIzNDU2
And just like the previous rule use Http method: GET, Webhook body: empty and Wait for response: checked.
The next rule component is an advanced compare condition: {{webhookResponse.status}} equals 200
To check if we get a valid response. And then we can add a component to edit issue fields:
Satisfaction comment: {{webhookResponse.body.value.comment}}
This will grab the comment via a smart value from the webhook response. As you can see in the rule picture you can also add components that add values to the audit log. This is very convenient and will enable you to debug your automation rules.
Now that we have captured the satisfaction comment into a custom field, we can export is to our reports and drive our service desk to great heights!
Let us help you!
Hopefully, you are all set now to start taking advantage of the AFJ functionality in your Jira environment. When you are not able to accomplish what you are trying to automate, get in touch ! We’ve implemented thousands of automation rules over the years and will surely be able to help you. Of course, you can also reach out to us if you have any questions regarding Jira Software, Jira Service Desk for Cloud, Server or Data Center. In fact, you can contact us for any of your Atlassian related questions. We look forward to talking to you!